Confession – I love sewing, but I really love no-sew projects even more than I love sewing. Why? Because pulling out the sewing machine for one tiny project is just kind of a beating. And setting up the sewing machine to sew for several hours is, well….flat out impossible because I have three young children. So, here we are with a simple no-sew project. And a spring no-sew project at that – yippee!

Disclosure: My posts may contain affiliate links. If you buy something through one of those links, you won’t pay a penny more, but I may receive a small commission, which helps me keep this blog up and running, and partially supports my Coke Zero addiction. This includes links to amazon.com, because I am a participant in the Amazon Services LLC Associates Program.
Supplies:
- material – you can use any material you want. I used some muslin material from Hobby Lobby, but you could use a patterned fabric, or any scrap material you have on hand
- hot glue gun and hot glue sticks
- Poly-Fil stuffing – click here to purchase. This bag will last you quite a while, and it comes with a free stuffing tool that is really handy!
- twine
- cotton ball
- pen/pencil for tracing
- scissors
- printed out bunny template – click below to download the one I used
Here is the quick DIY video:
Directions:
- plug in your hot glue gun so that it has time to get hot
- print the bunny template and cut it out – I printed it on cardstock paper so that it’s easier to trace
- lay the bunny template on the material and trace it two times
- cut the bunny shapes out of the material
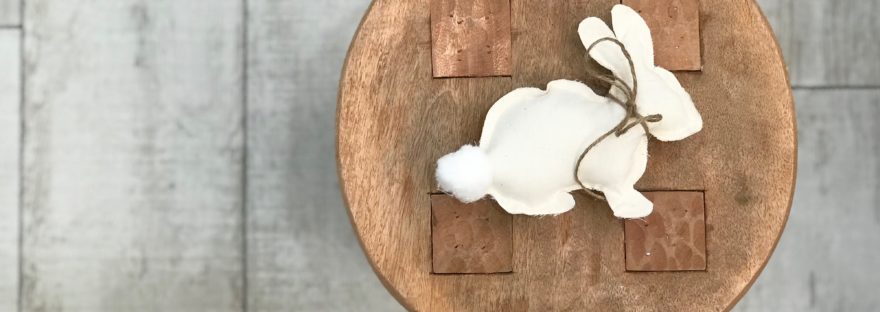
- hot glue the two bunnies together, leaving a hole near the tail area and near the nose area to make stuffing easier. (In the video above you’ll notice that I failed to leave a hole near the nose and it made stuffing the ears close to impossible. I ended up having to rip a hole in the nose area to stuff the ears, and then gluing the hole back up.)
- stuff the bunny with the Poly-fil, using the stuffing tool. While you’re stuffing the bunny you might find a tiny spot or two where the hot glue isn’t holding well enough. Don’t worry, you can touch these up later
- once the bunny is stuffed to your liking, use the hot glue gun to close up the holes near the tail and the nose, and any other spots that need touching up
- tie a piece of twine, or a cute ribbon, around the bunny’s neck
- glue a cotton ball to the bunny’s tail area
- pat yourself on the back because you just made an adorable, little stuffed animal without sewing!

Never miss a post!