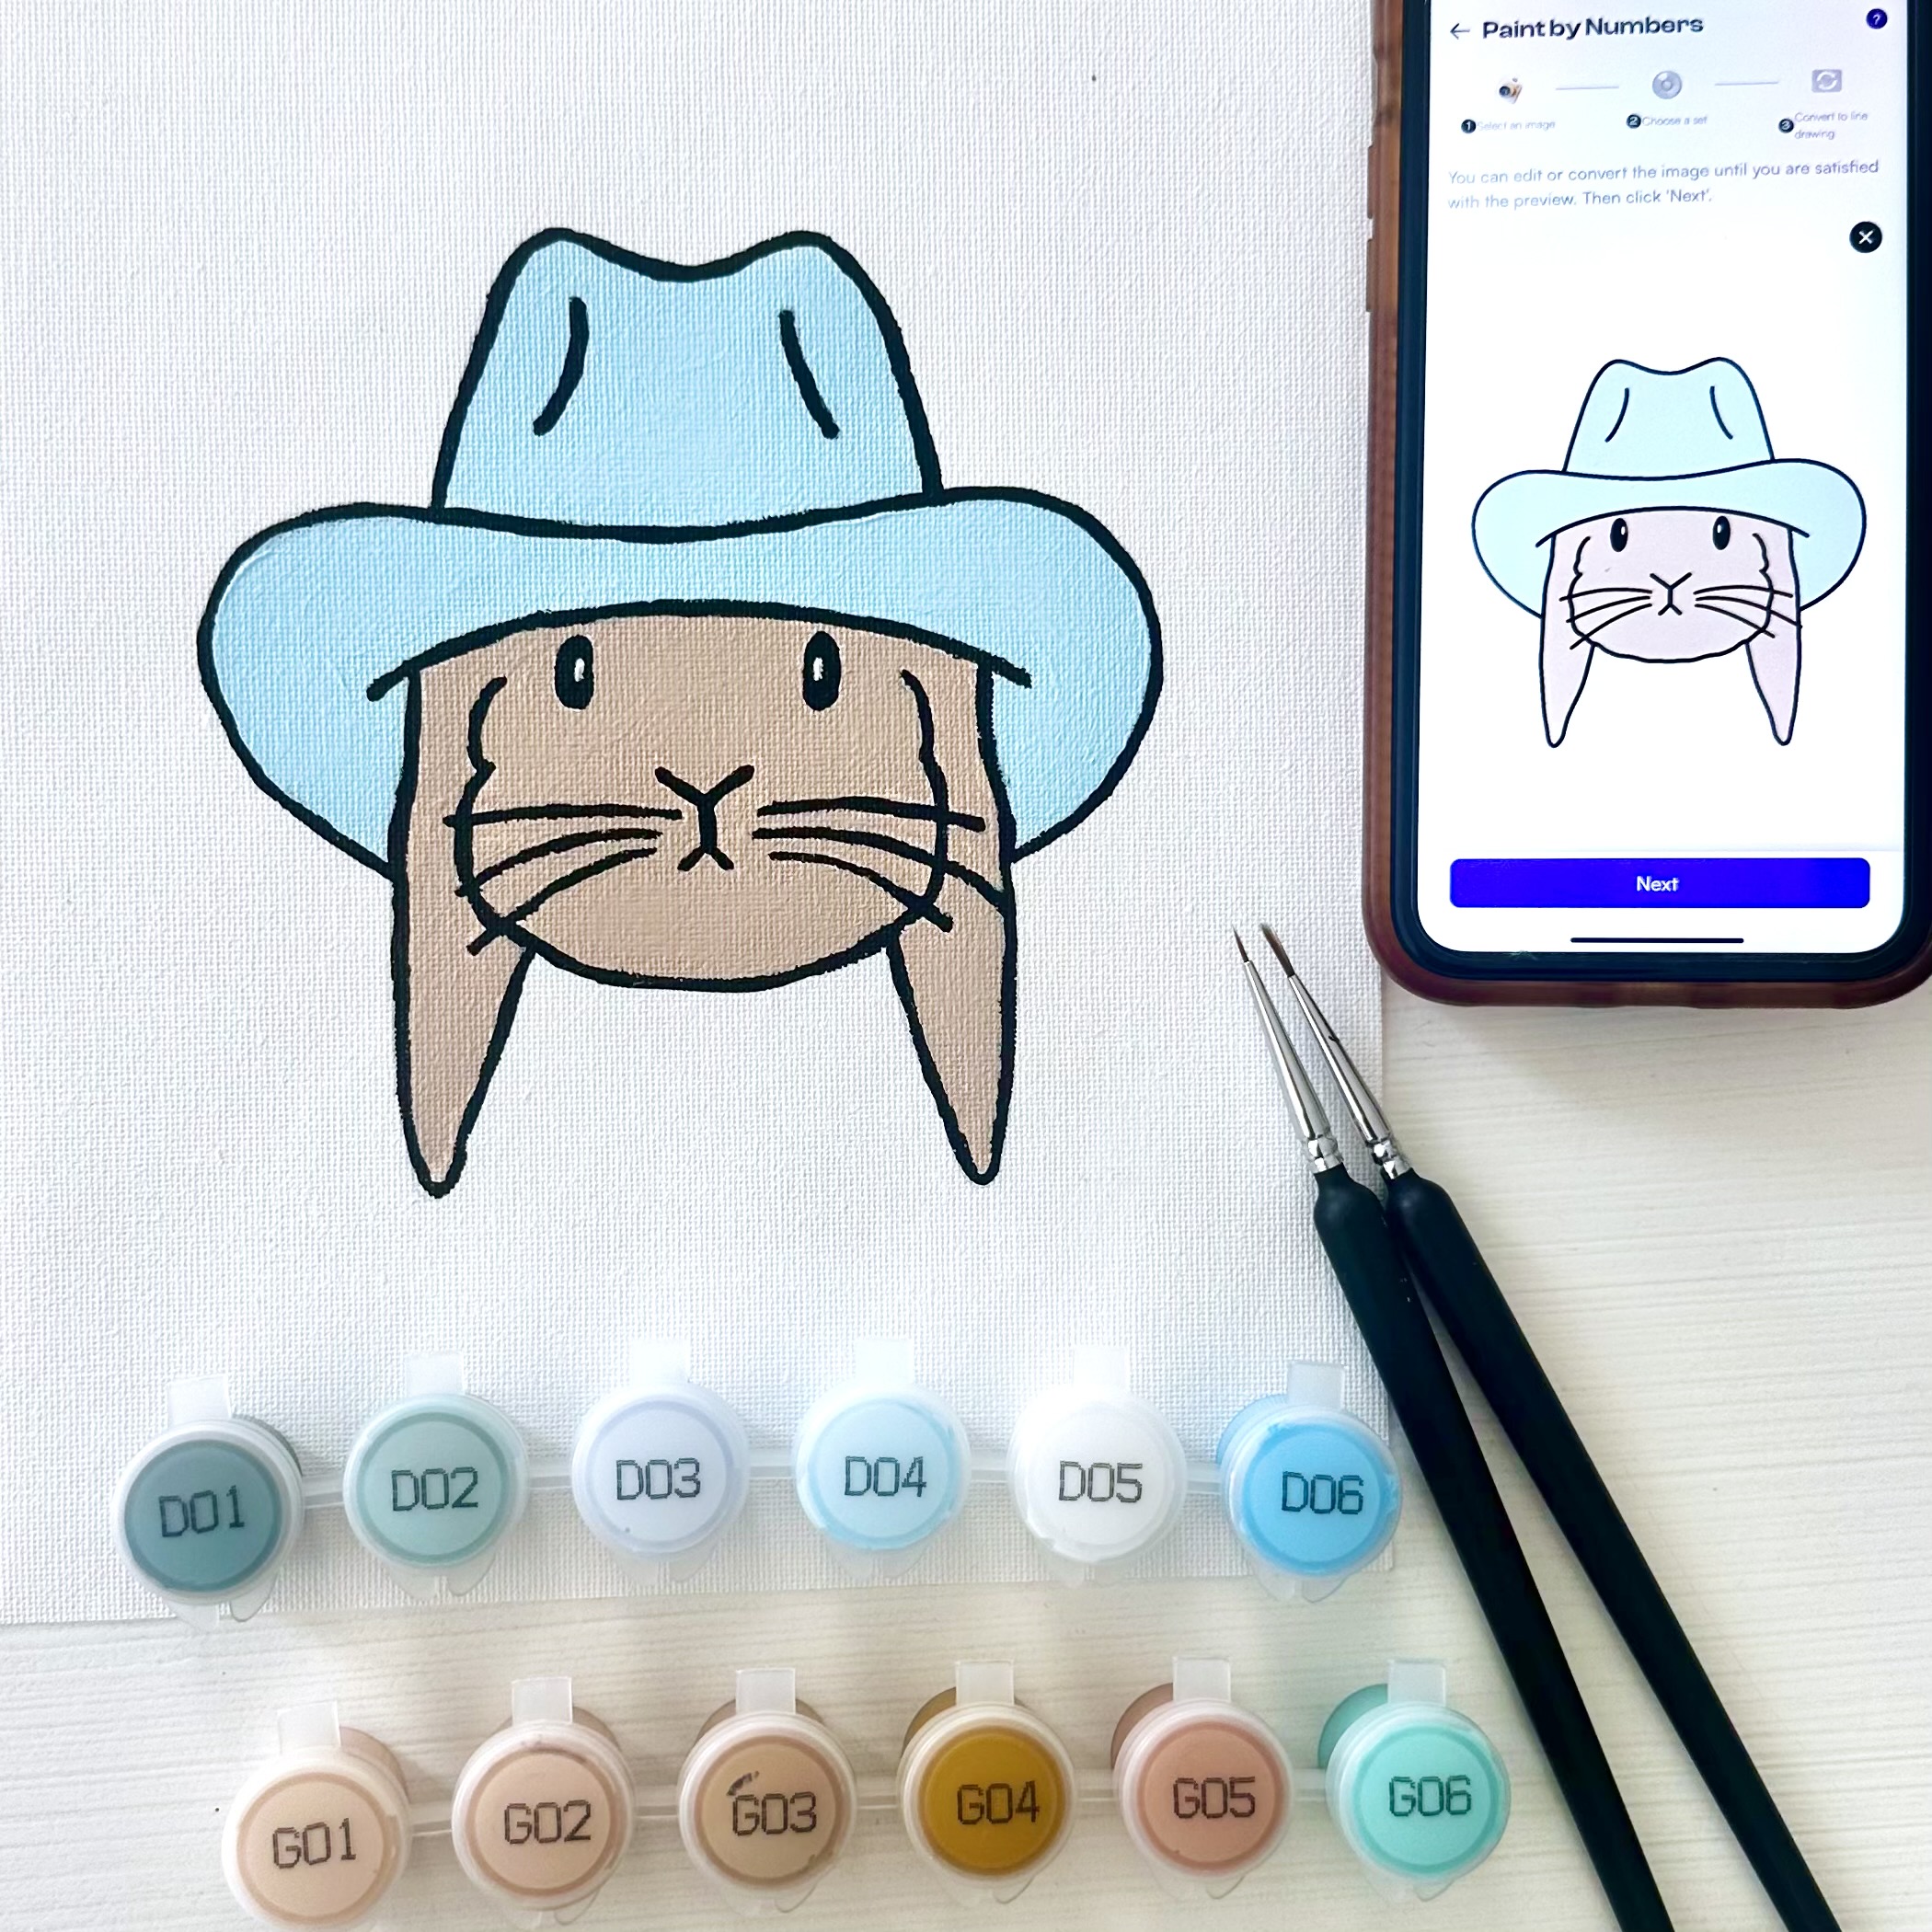
I’m so excited to share these 2 craft kits with you! And as the holiday season is quickly heading our way, these are great gift ideas for the art lovers in your family!
Supplies:
Caydo Fuse Bead Kit – you can shopHERE & use code SHE40 for 15% OFF your order, or you can buy it on Amazon HERE (please note: the coupon code will not work on Amazon).
Caydo Paint by Numbers Kit – you can shopHERE & use code SHE40 for 15% OFF your order, or you can buy it on Amazon HERE (please note: the coupon code will not work on Amazon).
Paper Cutter (only needed to cut canvas down if your printer CAN’T print on larger paper sizes, OR if you are wanting to make smaller sized paintings like I did)
Printer– sharing mine in case you don’t have a printer at home
Disclosure: My posts may contain affiliate links. If you buy something through one of those links, you won’t pay a penny more, but I may receive a small commission, which helps me keep this YouTube Channel up and running, and partially supports my Coke Zero addiction. This includes links to amazon.com, because I am a participant in the Amazon Services LLC Associates Program.
Instructions: Watch the video below!
While you’re here, check out some of my other popular crafts!
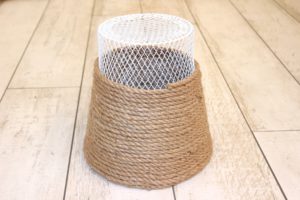
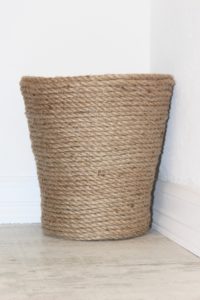
We’ve had the same old trash can in our master bedroom for years, and I’ve hated it for, well . . . years. I honestly don’t even know why I’ve kept it this long. It’s not cute, it’s too small, and it has several pieces of gum stuck to the inside of it. TMI? Sorry!
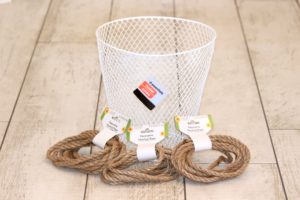
Lucky for me, on one of my many shopping trips to Dollar Tree to get more books to make more book stacks, I found a white metal trash can. I put it in my shopping cart and thought, “Hey, this is actually cuter than the one we have now, and it’s only $1. Can’t beat that!” I had no intentions of sprucing it up or doing anything to it. Well that was until I made it a couple of aisles over and found rope. Who knew Dollar Tree had rope?! And nice rope at that! I found it in packages of 9.5 feet – for $1! *Note – I did NOT buy enough rope on my first trip because I underestimated how much it would take to cover that bad boy, and on my second trip to a different Dollar Tree I found that their packages of rope had 13 feet of rope, instead of 9.5 feet. It was my lucky day! Either way, pay attention to how much rope is in the packages that you buy so that you get the right amount!
Supplies:
hot glue gun and glue sticks
Dollar Tree trash can, or a cheap metal trash can from anywhere
rope – it took 86 feet of rope to cover the trash can. Can you even believe it took that much rope? That’s over 28 yards of rope – which is over a quarter of a football field! Mind blown! Anyways, on to the directions!
Directions:
plug in your hot glue gun so that the glue can start heating up
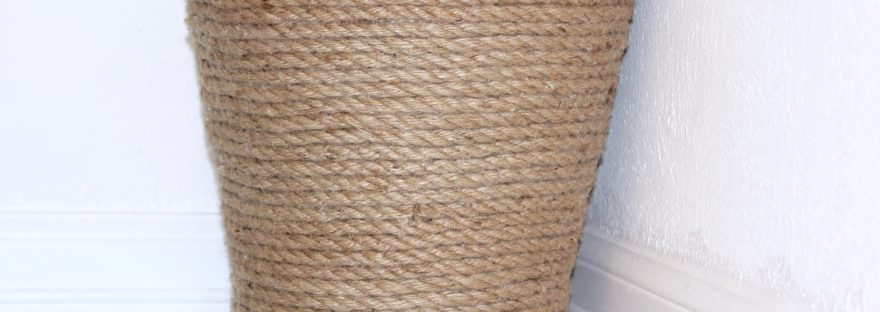
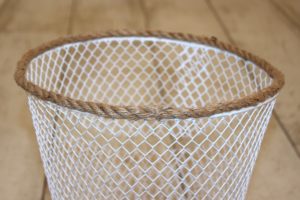
glue rope to the top rim of the trash can, working your way around the rim little by little to ensure that it’s staying in place.
once you make it back to where you started gluing the rope, cut the rope and glue it to the beginning piece, so that it makes one neat circle of rope. You want the top to look good!
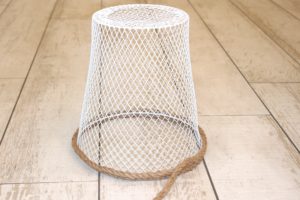
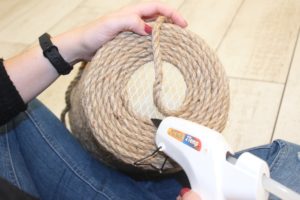
now turn the trash can upside down so that the rope you just glued on to the trash can is sitting on your floor/table.
after I glued that first piece of rope on the rim of the trash can, I did NOT glue the rope to the trash can at all, because it would ooze through the openings of the trash can. I ONLY glued the rope to the other rows of rope. So, now that the trash can is upside down, put glue along the piece of rope that you just finished putting on the rim. Continue gluing the new row onto the row below it until you run out of rope.
when you run out of rope, glue a new piece to the end of the last piece, and continue gluing the new piece of rope to the rows below it.
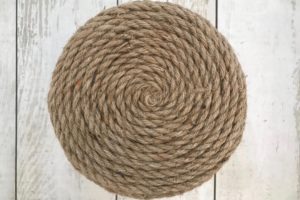
continue gluing the rope around the trash can until you reach the bottom of the trash can.
when you get to the bottom of the trash can you’re going to keep gluing the rope in concentric circles. I found it easiest to lean the trash can into my lap and turn it little by little as I glued the rope to the pieces below it. (see the picture above)
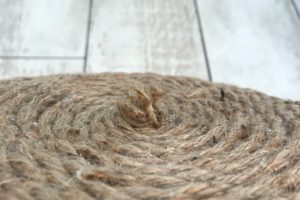
when I got close to the center of the bottom, I spiraled the rope into tiny circles the way it would be (without gluing it) so that I could get an idea of how much more rope I would need. Then I cut the piece to the approximate length so that it would be easier to work with.
as I worked my way toward the center of the bottom, the piece of rope started to fray. By the time I glued it down it looked like this (see the picture above). If this happens to you don’t panic!
all I did to fix it was cut off all the frayed ends, and then smash the rest into the glue.
Now you have a super cute trash can, to fill with . . . trash, ha!
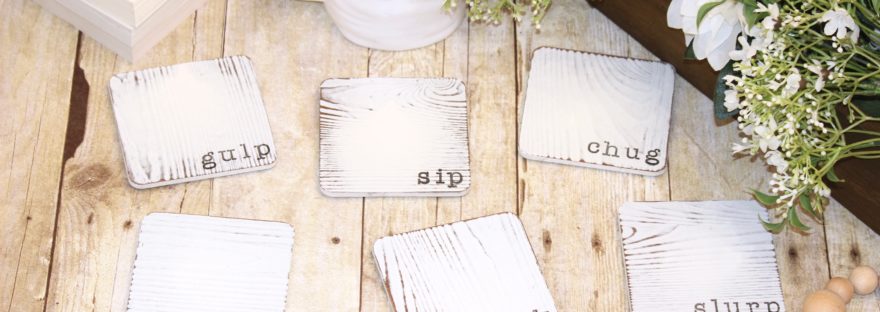
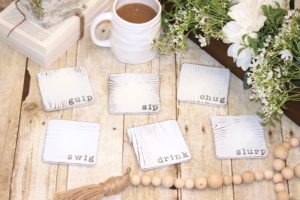
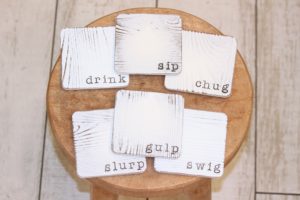
What do you do when your water heater breaks, and you’re stuck at your house for hours while the plumber replaces it? You cry a little (because money) and you craft a lot (because distractions needed)! So here I am with my dry shampooed messy bun (we haven’t had hot water in 2 days #firstworldproblems) and craft supplies, bringing you the cutest DIY hand stamped farmhouse coasters tutorial!
I found some really cute coasters at Michaels last week for 30% off. I had already found some different ones at Hobby Lobby that were plain wood, which I was planning on painting white, so when I saw these I had to grab them! They were already painted white and distressed which saved me 2 steps! Woo hoo!
These farmhouse coasters are a super easy DIY project, and they are perfect for keeping your furniture safe while still showing off your farmhouse style.
Disclosure: My posts may contain affiliate links. If you buy something through one of those links, you won’t pay a penny more, but I may receive a small commission, which helps me keep this DIY blog up and running, and partially supports my Coke Zero addiction. This includes links to amazon.com, because I am a participant in the Amazon Services LLC Associates Program.
I like to provide links to both craft stores and Amazon because I know that some of you might not live close to craft stores, or you might have little ones that make it difficult to shop for craft supplies – which I TOTALLY understand! Not too long ago I had 3 little girls all under 3.5 years old! I’m not even sure how I survived that ha! Anyways, below are some links. And remember that for most items online Michaels has a “buy online, pick up in the store (same day)” option, and they also have free shipping for online orders of $49+
Supplies:
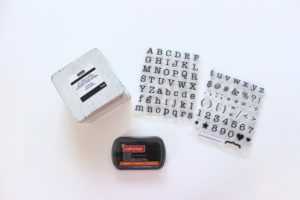
stamps – click here to get the ones I used. These are my absolute favorite alphabet stamps! They are made by Recollections, which is a Michaels brand, so you can only find them at Michaels.
acrylic blocks – click here to shop Michaels acrylic blocks, or click here to buy similar ones on Amazon
ink pad – click here to get the one I used from Michaels, or click here to get a similar one from Amazon
coasters – the coasters I used are no longer for sale, but you can use these coasters – and then you can just paint them white and sand them using this paint and this sand paper.
polyurethane spray paint – this is the one I used.I used a satin finish. I would recommend using matte or satin, and not semi-gloss or gloss. Most likely you don’t want the coasters to be shiny.
felt pads – I got mine from Walmart, but click here to see some similar ones I found on Amazon
Watch the video below to see how I made the coasters, or scroll down for the step by step directions.
Directions:
put your stamps on the acrylic stamping block
press the stamps into the ink pad, making sure the letters are fully covered in ink
stamp the words onto the coasters in the desired location
let the ink dry on the coasters for at least 30 minutes
spray the coasters with a few coats of the polyurethane spray. You don’t want to reapply coats too close together, so make sure you follow the directions on the back of the can.
after the coasters are fully dried, put the sticky pads on the bottom of the coasters, to ensure that the coasters won’t scratch your furniture.
enjoy your favorite beverage on your new adorable hand stamped farmhouse coasters!
If you are new to stamping, click here to watch our tutorial on how to clean your clear stamps.
Are you obsessed with your clear stamps? It’s okay to admit it, I won’t judge you. I’m actually kind of obsessed with mine too, and maybe it’s thanks to my slight OCD tendencies, but I really like keeping those bad boys clean. I’ve noticed a few things happen when I don’t clean them properly:
the stamps aren’t as sticky, and therefore they don’t stick to the acrylic mounting blocks as well. And nothing is more frustrating than stamps that constantly fall off of the acrylic block as you’re about to stamp them on something.
the fresh ink doesn’t show up as well on the stamps (since they are already slightly dirty), making it harder to tell if the stamps are really covered in fresh ink before stamping on a surface. This can result in you stamping a word where only part of the letters were actually inked, therefore you have to re-stamp the word by inking the stamp again and then trying to line it up perfectly again. This is 0% fun.
colors can get mixed together making the results not so desirable. Think about it – if you are using a gray ink on stamps that were previously dipped in black ink, and not cleaned properly, your gray ink will likely appear darker than desired because of the black ink left on the stamps. Doing this will also result in contamination of your gray ink pad. I know, I know. Contamination is a strong word, but getting black ink in a gray ink pad (or any color for that matter) is no bueno. Trust me.
dried ink stuck on the stamps can actually clog up parts of the stamps resulting in unclear images. And who loves unclear stamping? Not me!
Okay, have I convinced you to clean your clear stamps properly? Good, I thought so!
Disclosure: My posts may contain affiliate links. If you buy something through one of those links, you won’t pay a penny more, but I may receive a small commission, which helps me keep this blog up and running, and partially supports my Coke Zero addiction. This includes links to amazon.com, because I am a participant in the Amazon Services LLC Associates Program.
Supplies:
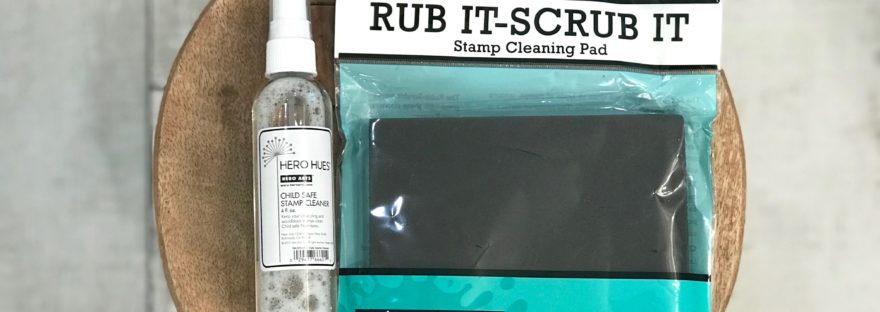
I got my stamp cleaning pad and spray both from Hobby Lobby, however the cleaning pad is not on their website at this time, but I was able to find it on Amazon. The cleaning spray I used IS on the Hobby Lobby website, but not Amazon, so I found a similar one on Amazon in case you want to purchase both items from Amazon. If you don’t want to buy online, just visit your local craft supply store – they should have some similar options that will work. To buy online see the links below:
spray the stamp cleaning spray onto the cleaning pad
scrub the stamps (on the acrylic block) on the cleaning pad
stamp off the excess ink onto scrap paper or a paper towel again
spray some more cleaning spray into a paper towel and clean the stamps one at a time, making sure they are fully cleaned and dry
put the stamps back on the clear stamp sheet that they came on when you bought them – this makes it easy to find the exact stamps/letters you are looking for, and it keeps them from getting misshaped or lost
Below is a video of me actually cleaning my stamps after doing a hand stamped book stack tutorial:
*To see the Hand Stamped Book Stack DIY tutorial blog post click here.
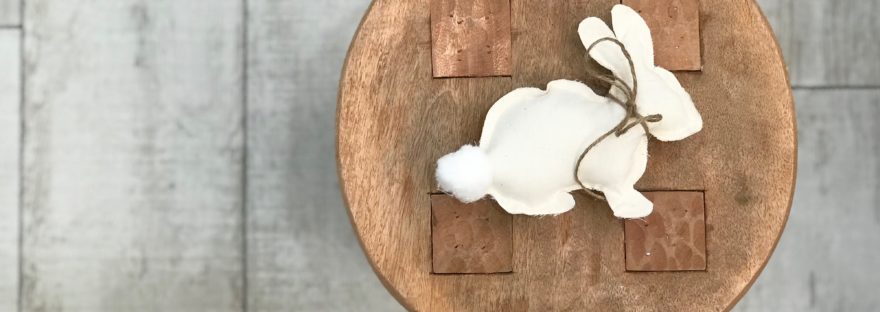
Confession – I love sewing, but I really love no-sew projects even more than I love sewing. Why? Because pulling out the sewing machine for one tiny project is just kind of a beating. And setting up the sewing machine to sew for several hours is, well….flat out impossible because I have three young children. So, here we are with a simple no-sew project. And a spring no-sew project at that – yippee!
Disclosure: My posts may contain affiliate links. If you buy something through one of those links, you won’t pay a penny more, but I may receive a small commission, which helps me keep this blog up and running, and partially supports my Coke Zero addiction. This includes links to amazon.com, because I am a participant in the Amazon Services LLC Associates Program.
Supplies:
material – you can use any material you want. I used some muslin material from Hobby Lobby, but you could use a patterned fabric, or any scrap material you have on hand
hot glue gun and hot glue sticks
Poly-Fil stuffing – click here to purchase. This bag will last you quite a while, and it comes with a free stuffing tool that is really handy!
twine
cotton ball
pen/pencil for tracing
scissors
printed out bunny template – click below to download the one I used
plug in your hot glue gun so that it has time to get hot
print the bunny template and cut it out – I printed it on cardstock paper so that it’s easier to trace
lay the bunny template on the material and trace it two times
cut the bunny shapes out of the material
hot glue the two bunnies together, leaving a hole near the tail area and near the nose area to make stuffing easier. (In the video above you’ll notice that I failed to leave a hole near the nose and it made stuffing the ears close to impossible. I ended up having to rip a hole in the nose area to stuff the ears, and then gluing the hole back up.)
stuff the bunny with the Poly-fil, using the stuffing tool. While you’re stuffing the bunny you might find a tiny spot or two where the hot glue isn’t holding well enough. Don’t worry, you can touch these up later
once the bunny is stuffed to your liking, use the hot glue gun to close up the holes near the tail and the nose, and any other spots that need touching up
tie a piece of twine, or a cute ribbon, around the bunny’s neck
glue a cotton ball to the bunny’s tail area
pat yourself on the back because you just made an adorable, little stuffed animal without sewing!
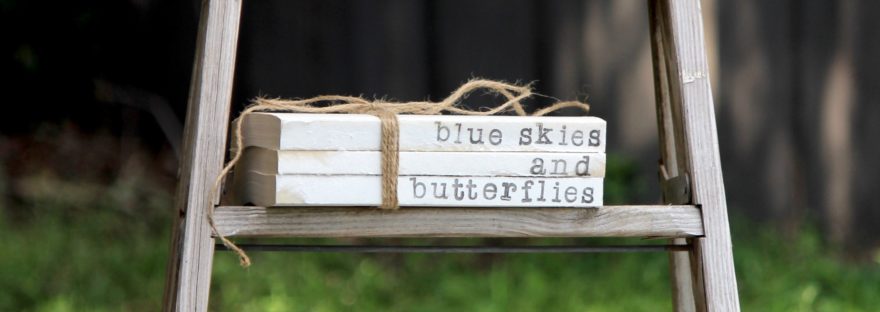
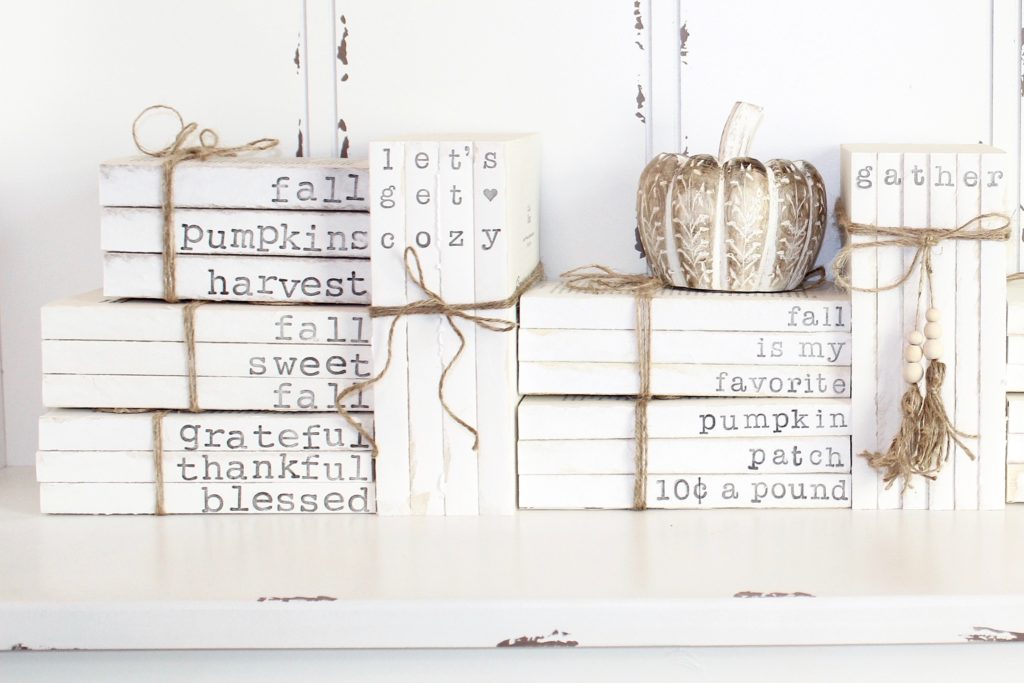
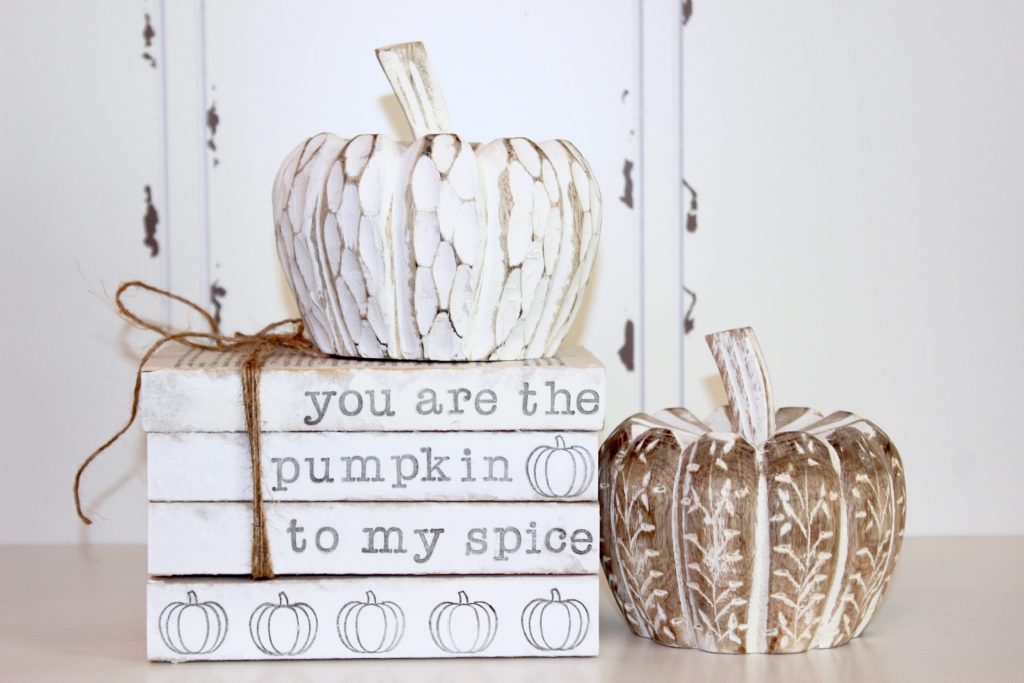
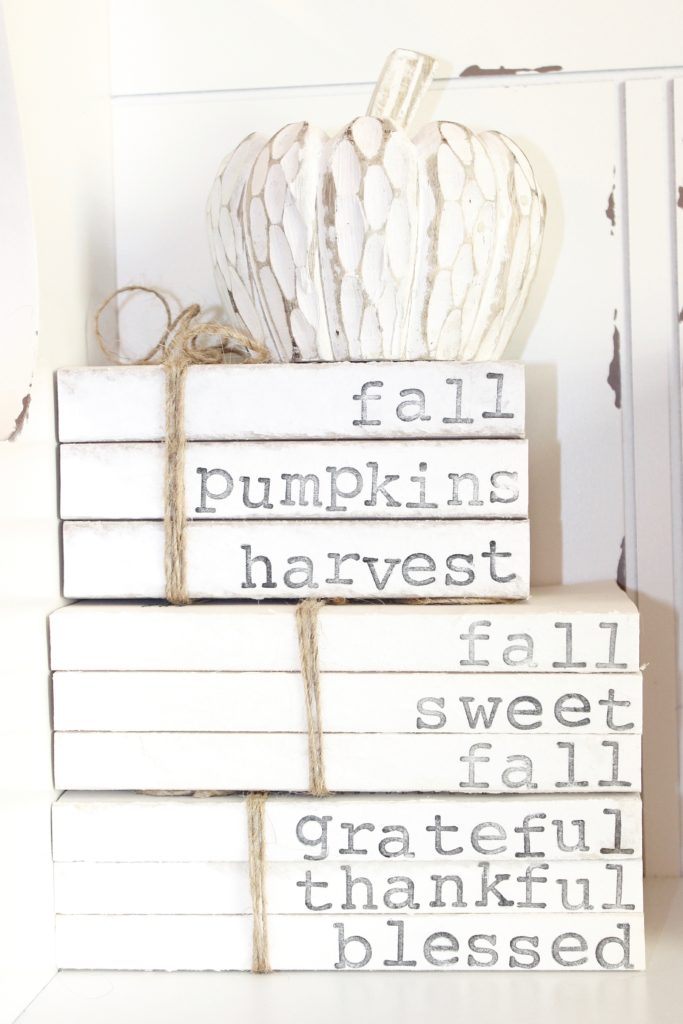
Hand stamped book stacks are probably my favorite craft of all time, and they are perfect for all of you farmhouse lovers! You guys – I have a book stack in just about every room of our house. It’s getting a little out of control really…but can you blame me? They’re so cute! And the best part is, they are so cheap and so easy to make, and you can make new ones for each season/holiday. It just doesn’t get any better than that!
Disclosure: My posts may contain affiliate links. If you buy something through one of those links, you won’t pay a penny more, but I may receive a small commission, which helps me keep this blog up and running, and partially supports my Coke Zero addiction. This includes links to amazon.com, because I am a participant in the Amazon Services LLC Associates Program.
Supplies:
paperback books measuring the same size – the number of books you need depends on the words/quote you want to put on them. I have made stacks ranging from 2-5 books. I get my books from Dollar Tree for only $1!
stamps – I’ve listed a few different options of alphabet stamps because my favorite stamps are often sold out online. Check out the options below!
click here to get the ones I used from Michaels. These are my favorite stamps, and I have used them for SO many craft projects!
click here for another set of great alphabet stamps from Michaels. This is a set of rubber stamps (not clear stamps like the ones I used in the video), and therefore you do NOT need the acrylic blocks if you buy these. The rubber stamps work great, and I have used them myself for book stacks too! They are a little bigger than the other stamps which gives them a really cool look, and make them easier to read. The only word of advice I have with using the rubber block stamps is to clean off the rubber area around the letter after you press the stamp into the ink pad. Otherwise, ink will be all over the entire rubber area and when you stamp it, it will leave ink spots around the letters. I just use a makeup remover wipe to wipe away excess ink from the rubber area before stamping the letters.
Click here to get some cute clear alphabet stamps from Amazon. These are very similar to my favorite set from Michaels, however they are just a little bit smaller in size. CHECK OUT THE PICTURES AT THE BOTTOM OF THE PAGE TO SEE A SIZE COMPARISON OF ALL 3 OF THESE STAMP SETS!
ink pad – click here to see the one I used from Michaels, or click here to get a similar one from Amazon.
acrylic block (if using the clear stamps) – click here to shop Michaels acrylic blocks, or click here to buy similar ones from Amazon.
twine – click here to shop Michaels twine, or click here to shop twine on Amazon
scissors
Here is the quick DYI video:
Instructions:
peel the covers off of the books
find the book that you want to be on top (I always choose one that has a good/appropriate top page)
put your clear stamps on your acrylic block
press the stamps (on the acrylic block) into the ink pad, making sure the stamps are fully covered in ink
press the inked stamps onto the books – if a letter doesn’t show up as well as you’d like, just re-ink the stamp and try again. You can’t mess this up! If you re-stamp it and it’s a little “off” don’t worry about it – it adds character!
after you’ve stamped all the books, wrap twine around the book stack, and tie the twine in a bow
See? I told you it was easy! I can’t wait to hear about all of the book stacks that you make! But before you start crafting, look below to see part of my collection. Okay, it isn’t even half of my collection, but maybe seeing some of these will give you some ideas for what kind of book stacks you want to make! And you’ll notice the special best mom ever book stack below that I’m giving to my mom for Mother’s Day. I think she’s going to love it, and she is the best mom ever so she deserves to have this book stack displayed in her house like a prized trophy!
The perfect gift for your awesome mom!
I love Family Stacks! They are perfect to set in your living room, and they also make perfect gifts. And don’t forget about those grandma’s and great-grandma’s that would probably love a book stack with their grandchildren/great-grandchildren’s names on them.
Birth announcement book stacks are the perfect keepsake, whether it’s for your little one, or your bestie’s.
Don’t forget that you can make vertical book stacks too, like my joy book stack above! The sky is really the limit with book stacks!
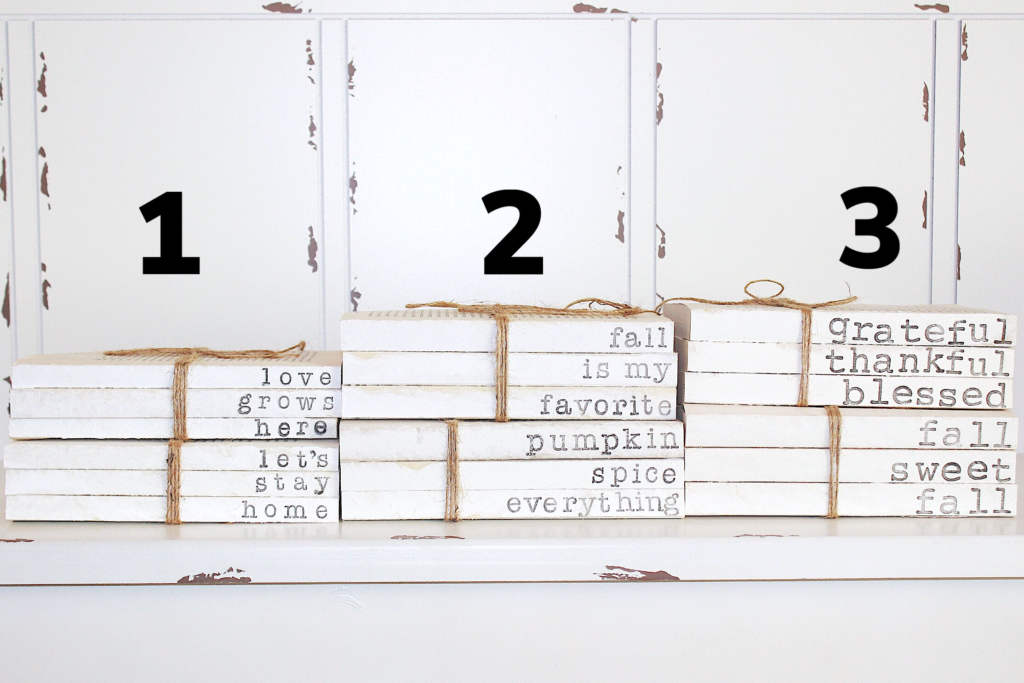
The book stacks on the left were made using the rubber stamp set, and the rest of the book stacks were made using the clear stamp set from Michaels.
This pumpkin stamp is perfect for all of your fall/pumpkin book stacks! I used the smaller pumpkin stamp from this stamp set.
Here is a close up of the book stacks made using the rubber stamp set.
Here is a side by side comparison of all 3 stamp options (shown from smallest to biggest in size), and they are linked below according to the numbers. #1 stamps, #2 stamps, #3 stamps
I can’t wait to see all of the book stacks that you are going to make! Make sure you tag me on Instagram @shescraftyandsheknowsit with your masterpieces! I always love to see what all of you come up with!
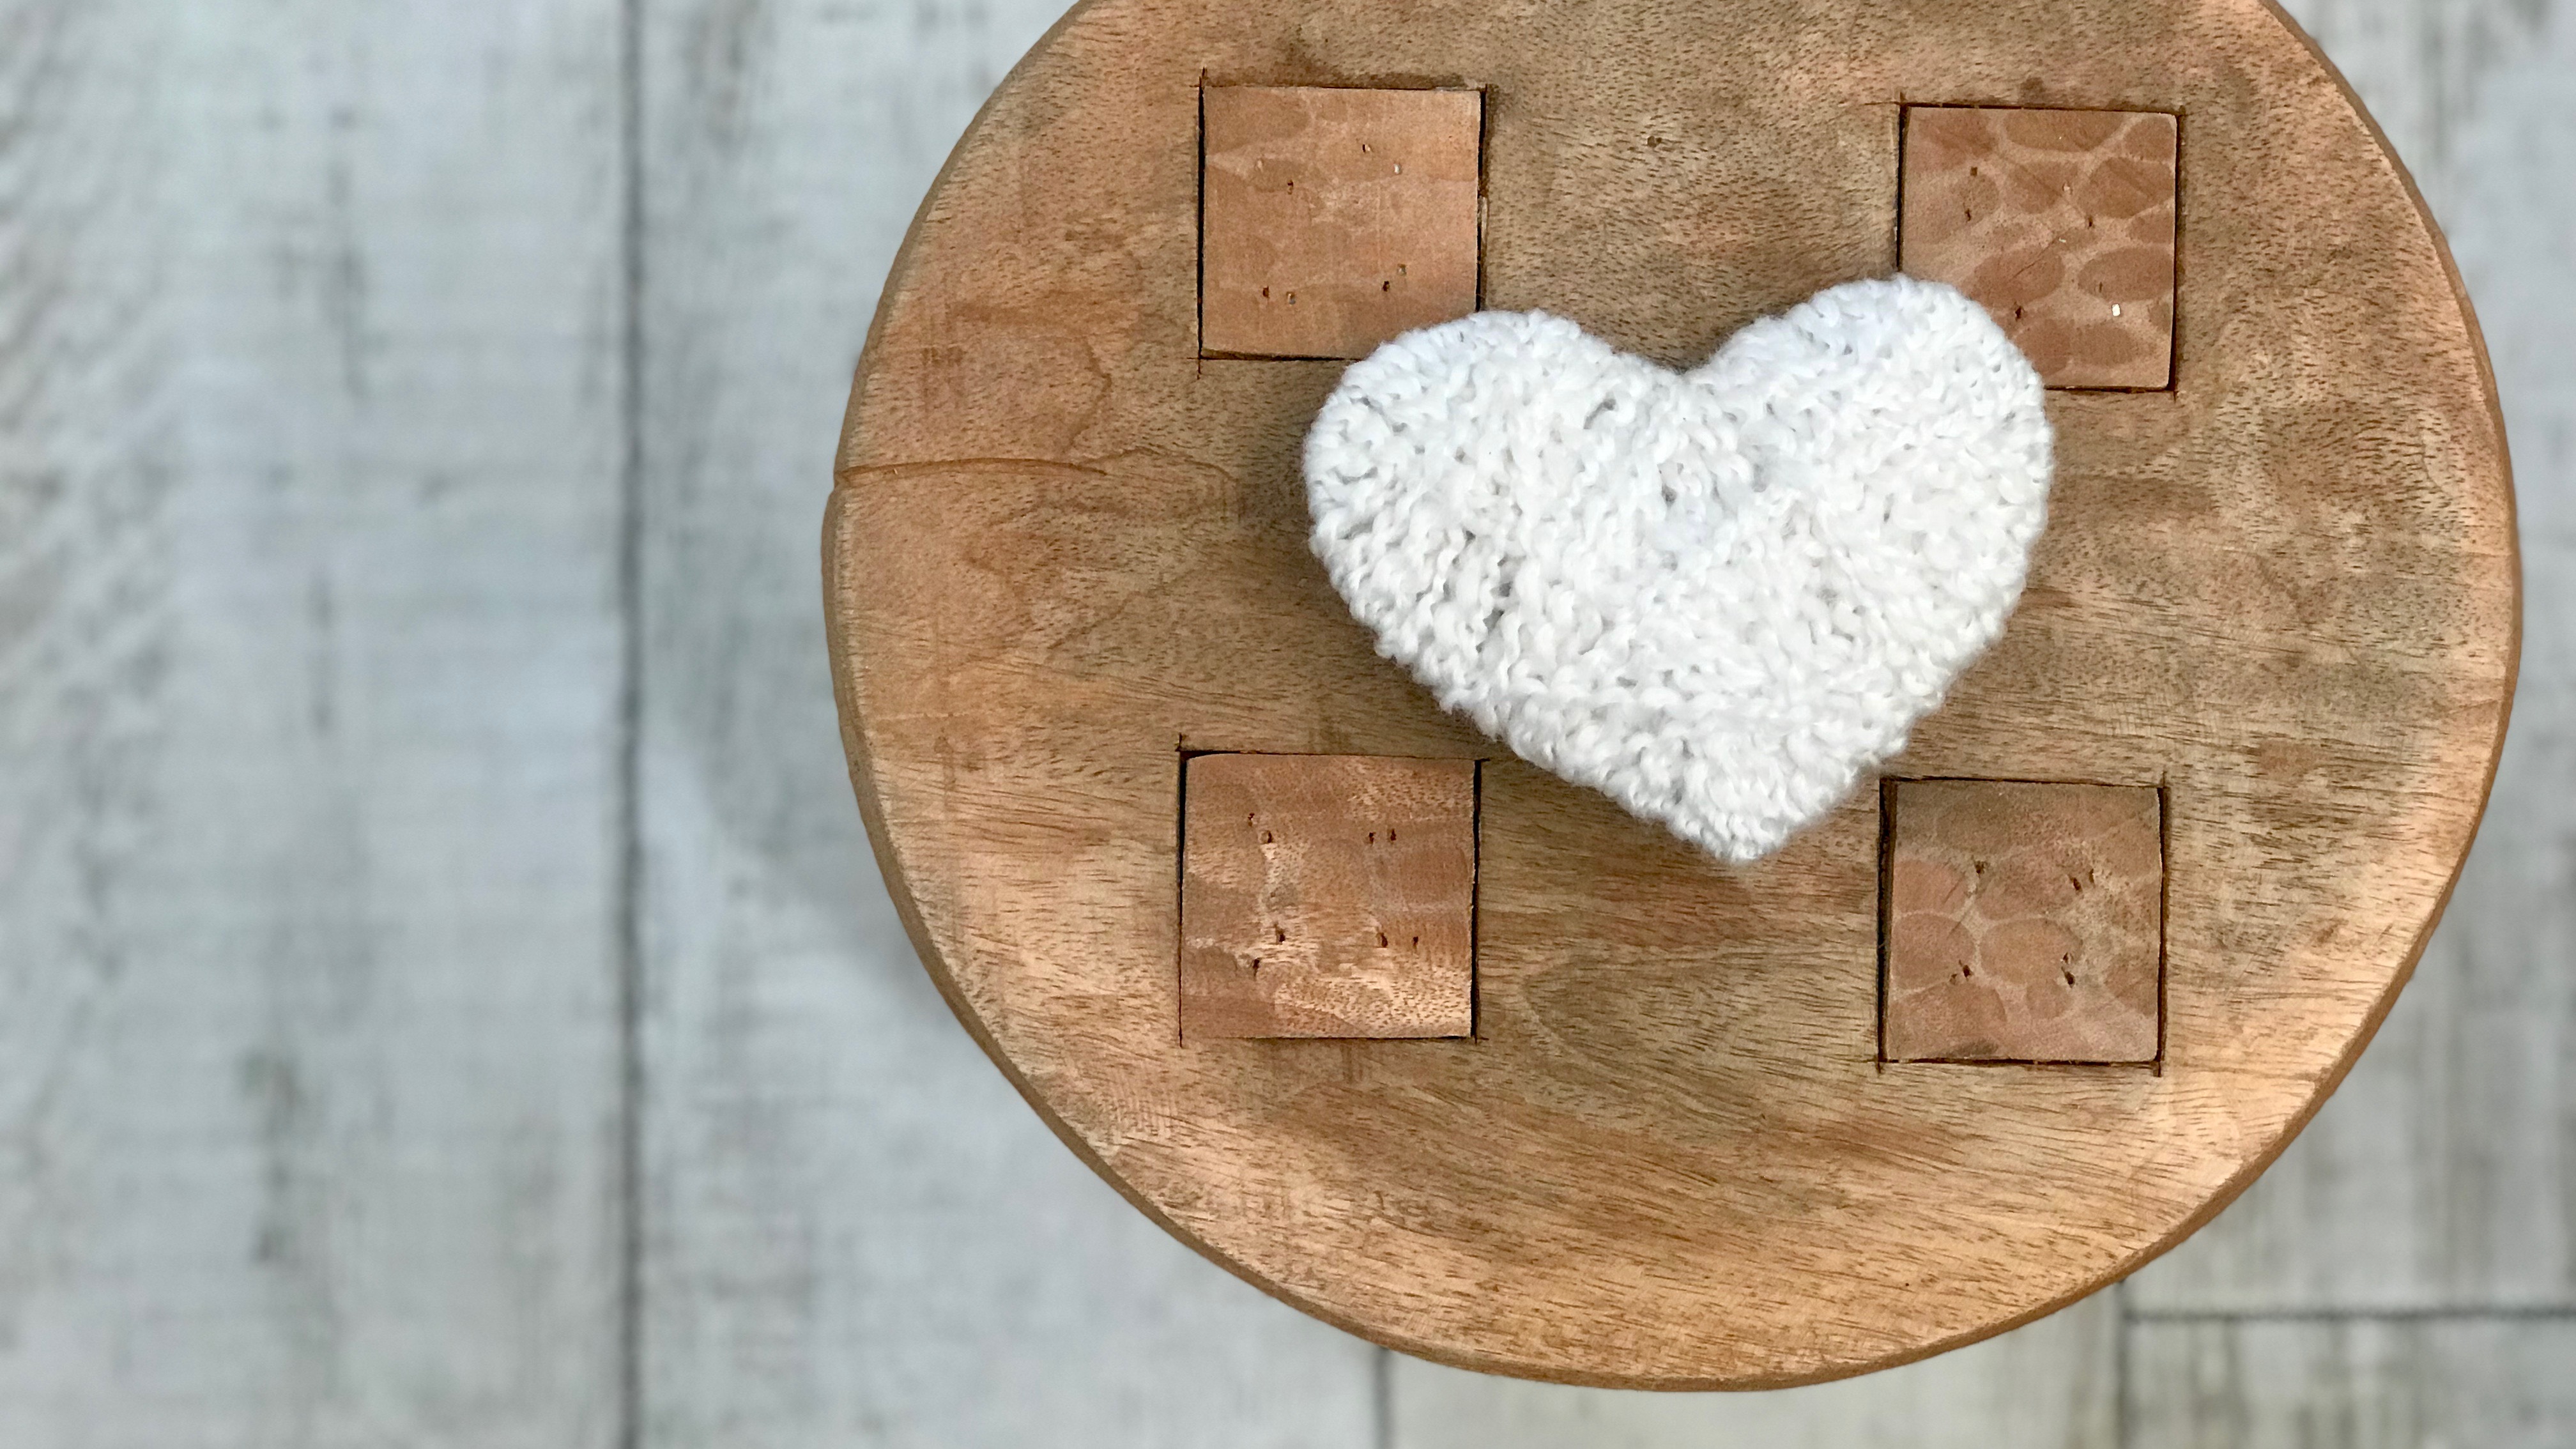
This is a super simple craft that will take you less than 10 minutes from start to finish. I have made several of these adorable hearts – a couple are sitting on our mantel, some are in my girls’ rooms, and some were gifted to friends.
Watch our DIY YouTube video below:
Supplies:
thin cardboard/thick card stock (I used part of an old shoe box)
yarn/jute
scissors
pencil (unless you’re good at cutting hearts freehand)
Directions:
draw a heart – your heart can be any size. I made a few different sizes and set them together.
cut out your heart
wrap the heart with your yarn
keep wrapping until the cardboard is completely covered.
once the cardboard is covered, tie the yarn off and tuck the end under some of the pieces wrapped around the heart
cut the excess yarn if you have any sticking out from where the knot was tucked in
Ta-da! You have an adorable yarn heart to set around your house, or gift to a friend!